
Customising the UI
The Quest user interface is a web page. Even the desktop version has a built-in browser (Chrome as it happens), and what the player sees is just the same as any other web page on the internet.
Potentially this means you can set up your game to look like anything. In practice, this is not always trivial and at least some knowledge of HTML, CSS, JavaScript and JQuery are vital for the more advanced features. The MDN Web Docs are a good resource for learning these. That said, we can make a lot of changes without knowing too much about any of them.
Web pages
Section titled “Web pages”To really get to grips with the UI you have to understand how it is represented in the computer.
When you access most web pages, your browser sends a message, an HTTP request, to a server, which sends back an HTTP response, and that’s the end of the interaction until you navigate again. Quest doesn’t work like that. Once your game has loaded, the whole game engine runs directly in your browser (compiled to WebAssembly) alongside the JavaScript that draws the interface - there’s no server involved at all, and no request/response cycle per turn.
JavaScript
Section titled “JavaScript”JavaScript is a programming language built into most web browsers. Most interactive web pages use JavaScript to make stuff happen on them.
By the way, JavaScript is not the same as Java!
JavaScript is also used in Quest, which uses a web browser interface even for the desktop app. Without JavaScript, you would have a static page. The JavaScript collects and processes the user clicking on the compass or whatever, it takes input from the command bar, it communicates with the Quest engine running alongside it in the browser, and it updates the web page being displayed as most text is output.
Quest also uses a JavaScript extension called jQuery, which is a set of functions that gets downloaded with the original page - you’ll see it used throughout these examples as the $(...) syntax.
Quest has a JavaScript object, called JS, and we can use that to dynamically change the web page that the player is looking at. Getting information back from the web page is something else again.
The JS object
Section titled “The JS object”The JS object is a quick way to use JavaScript in your game.
Let us start with the easy stuff. Quest has an addText method on the JS object which simply adds the given text to the web page at a certain point, i.e., at the end of the existing output text. JS.addText is used by both OutputTextRaw and OutputTextRawNoBr, which are in turn used by OutputTextRaw and OutputTextRawNoBr respectively, and OutputTextRaw is in turn used by msg and PrintCentred, so everything you print to screen uses JS.addText.
You can use it to access the other built-in JavaScript functions (and your own too), and there are several that can be used to change the UI.
// Use these two to turn features on and off during play// Valid element names include "#txtCommandDiv", "#location"JS.uiShow(element)JS.uiHide(element)// For the panes on the right, use this:JS.panesVisible(Boolean)
// Use these to modify the texts on the UIJS.setInterfaceString ("InventoryLabel", "You are holding")JS.setInterfaceString ("StatusLabel", "How you are doing")JS.setInterfaceString ("PlacesObjectsLabel", "Things you can see")JS.setInterfaceString ("CompassLabel", "Directions you can go")JS.setInterfaceString ("InButtonLabel", "In")JS.setInterfaceString ("OutButtonLabel", "out")JS.setInterfaceString ("EmptyListLabel", "Stuff all")JS.setInterfaceString ("NothingSelectedLabel", "-")JS.setInterfaceString ("TypeHereLabel", "Now what?")JS.setInterfaceString ("ContinueLabel", "Just press a button to get on with it")
// Others that may or may not be usefulJS.setGameWidth(width)JS.hideBorder()JS.setGamePadding(top, bottom, left, right)JS.addExternalStylesheet(stylesheet)// I think the stylesheet should be a file name (or perhaps a URL) as the parameterJS.SetMenuBackground(colour)JS.SetMenuForeground(colour)JS.SetMenuHoverBackground(colour)JS.SetMenuHoverForeground(colour)JS.SetMenuFontName(fontname)// these refer to the menu that appears when the player clicks on a hyperlink in the textJS.SetMenuFontSize(size)// the size must be a string that is a number followed by "pt"JS.TurnOffHyperlinksUnderline()JS.showStatusVisible(Boolean)JS.setBackground(colour)
If you want to do more than that, you need to learn a little about HTML and CSS…
HyperText Markup Language (HTML) is the way information is structured on a web page. Whilst playing, you can right-click and select “Inspect” (or similar) to see the HTML behind the current view, using your browser’s Developer Tools - this works the same way in the desktop app.
Here is an example:
<div id="divOutputAlign3" style="text-align: center" class="section1 title"> <span style="font-family:'Lucida Console', Monaco, monospace;color:Black;font-size:12pt;"> <span style="font-size:260%"> Cool Game </span> </span> <br></div>HTML code is made up of elements, and each element has a start tag (eg <div>) and an end tag (eg </div>). The bit between them is the content, and the content can be other elements or text or a mixture. The start tag can often have attributes, and these are important because they can give us a way to access the element. In the snippet above, the <div> has an attribute, id, which has the value “divOutputAlign3”. The id attribute will be important later.
Cascading style sheets (CSS) is the primary way for web pages to define the style, as opposed to the content; that is, what font to use, colours, etc. CSS is probably the technology you need to know properly, as really there is no short-cut here. The objective here is to set styles as you want them, so knowing the underlying style system is going to serve you well, and we can only do a brief overview here.
An example of CSS for a web page might looks like this:
#gameBorder { background-color: #800080; color: pink;}The first line determines what is controlled - in this case an element with the ID gameBorder (the # indicates ID rather than a class or element type; the # on the next line means something quite different, it indicates a colour). The second line defines the settings. There can be several lines, before we get to the close brace (this is the conventional way to layout CSS). For the second line, there are two parts, the name, in this case “background-color”, and the value, “#800080” (which is a dark magenta).
In summary, then, this CSS code will set the background colour of something with the ID “gameBorder” to be dark magenta, and the text to be pink.
CSS can also be set in HTML attributes. If you look back at the HTML example above, the <div> has an attribute, style, and the value is in CSS. The two <span> elements likewise have style attributes. The text, “Cool Game”, will be in the combined style of all those elements.
Open your browser’s Developer Tools again whilst playing (in Chrome, More Tools - Developer Tools; in Firefox, More Tools - Web Developer Tools; this works the same way in the desktop app). These vary a bit between browsers, but you should find you can highlight elements of HTML, and you will see what CSS applies, and where it comes from.
A note about colours
Section titled “A note about colours”In CSS you can use two formats for colours. The name or the hex value. About a hundred colours are named (note they have no spaces, but are case insensitive). The hex value must start with a #. It must be followed by three pairs of characters, one pair each for red, green and blue, where each pair is the hexadecimal value, from 00 to FF. Alternatively, you can use three characters one each for red, green and blue; in this case each character is doubled to make the full version, so “#f08” is the same colour as “#ff0088”.
If the hex value makes no sense, stick to the names!
https://en.wikipedia.org/wiki/Web_colors
jQuery
Section titled “jQuery”Static web pages use CSS like that, but if you want things to change, you need JavaScript. JavaScript is a fully-fledged programming language (and is not the same as Java), and has become the standard for web browsers. We will try to avoid writing JavaScript code as far as possible - which is where jQuery comes in.
JQuery is a library for JavaScript that is built in to Quest. Among other things, it offers relatively easy ways to access parts of the HTML page.
This is how JQuery/JavaScript could be used to set the styles in the CSS example.
$('#gameBorder').css('background-color', '#800080');$('#gameBorder').css('color', 'pink');Notice that all the same information is there, just arranged differently, according to the syntax of JavaScript/JQuery. The $ at the start signifies this is JQuery (it is a shorthand for a function called JQuery), and $(‘#gameBorder’) will grab the thing with the ID “gameBorder” (again, the # indicates this is an ID). Once we have that we call a method (or function) called “css”, and send it two parameters, the thing we want to change and the new value.
Quest sets up the User Interface in the InitInterface function, which is defined in Core.aslx. Almost the last thing it does is call a script, “inituserinterface”, on the game object (if it exists), after which game.start will run (unless the player is resuming with a saved game). The best way to modify the user interface, then, is using the “inituserinterface” script.
The big advantage of doing it this way is that this will be called whenever Quest thinks the interface needs updating, which is not just at the start of the game (for example, when the screen is cleared). You also get the bonus of having all your interface stuff in the same place, which keeps it neat.
To edit the script, go to the Features tab of the game object, and check that “Show advanced scripts for the game object” is ticked. Then go to the Advanced Scripts tab. The “inituserinterface” script is at the top.
Note, however, that you should not print anything from the “inituserinterface” script (you might feel tempted to output CSS or some JavaScripts using msg or OutputTextRawNoBr). If you do, when a saved game is reloaded, all the new text will get inserted into the top of the existing text. Instead, use the JS.addScript function, which will add your JavaScript or CSS or whatever outside the normal flow of text.
Because it is easier to show, all the tricks here will be in code. Click the “Code view” button, and a text box will appear. Just copy-and-paste code into here. You can paste in as many code blocks as you like, and it should work fine (note that that is not necessarily true of all code).
Using all that in Quest
Section titled “Using all that in Quest”So now we know where to put the code in Quest, and we know the JavaScript to do it. We just need a way to pass the JavaScript from the game to the interface. This is done using the JS object, for example using the eval function:
JS.eval("$('#gameBorder').css('background-color', '#800080');")JS.eval("$('#gameBorder').css('color', 'pink');")The JS object is a way to access any JavaScript function, even those you add yourself. The eval function is useful because it will run any JavaScript code. So the first line above is saying, “JavaScript, please run this string as though it is JavaScript code”, and the string to run is $('#gameBorder').css('background-color', '#800080');, i.e., the code we had before.
Note that this is not a way to get information from the interface; this is a one-way street. Data is going from Quest to JavaScript only (there is a way to go the other way; that is how the player’s inputs get to Quest, but that is beyond the scope of this article).
Shortcuts
Section titled “Shortcuts”You can use the setCss function to do this sort of thing. Like eval, this belongs to the JS object. It takes two parameters, the element and the style. The style should be in the standard CSS format, with a colon between the name and the value, and a semi-colon between each setting. The example above would therefore look like this:
JS.setCss("#gameBorder", "background-color:#800080;color:pink;")Using this function, you can now change any element in the game (well nearly any, a few are a bit odd). You just need to know the id of the element and the right CSS to use.
To quickly format the game panes you can use setPanes. This takes two, four or five parameters, all of which are colours.
JS.setPanes ("black", "white")JS.setPanes ("orange", "black", "black", "orange")JS.setPanes ("midnightblue", "skyblue", "white", "midnightblue", "blue")Elements
Section titled “Elements”Bits of an HTML page are called elements, and “gameBorder” is just one of them. All HTML documents have an “html” element that contains everything else, and inside that it has a “head” and a “body” elements. Quest then has a few dozen elements that make up the interface inside the “body” element.
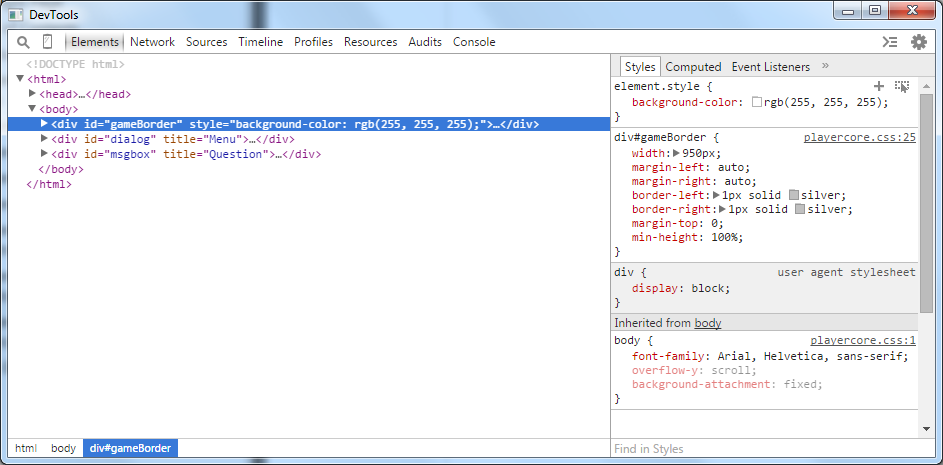
You can look at those elements as you play a game, using your browser’s Developer Tools (right-click on the page and choose “Inspect”, or similar - this works the same way in the desktop app). On the left you will see a hierarchy of elements (you will need to expand them to see them all), and on the right a list of properties. Click on an element, and it will be highlighted in your game so you can see what it refers to.
Most of the interesting elements are of the type “div”, and each is identified by an “id”. The gameBorder one looks like this:
CSS properties and values
Section titled “CSS properties and values”There are a large number of CSS properties, to get a full list, use the internet. I will mention just some of the interesting ones. You do need to be careful that you supply the right type of value, but we will look at that too. Also, be aware that CSS uses America spelling for “center” and “color” (but you can use both “grey” and “gray”).
The colour of text is determined by the “color” property. You can set colours in a number of ways, the easiest is to use a name. This Wiki page has a full list of available names (note that there are no spaces in the name; for once, capitalisation does not matter):
JS.setCss("#gameBorder", "color:blueviolet;")You can also set colours by using the RGB code. These both set the colour to red.
JS.setCss("#gameBorder", "color:rgb(255, 0, 0);")JS.setCss("#gameBorder", "color:#ff0000;")Each splits colours in to three components: red, green, blue. In the first, each component is a number from 0 to 255. In the second, it is a hexadecimal number from 00 to ff. If you do not know what hexadecimal is, use the other format.
background-color
Section titled “background-color”This works just the same as color, but changes the background for this element.
JS.setCss("#gameBorder", "background-color:blueviolet;")background-image
Section titled “background-image”You can set the background image for each element. The CSS requires that the image name go inside a url function call, and to ensure it works on-line, Quest requires the name go inside a GetFileURL, so it gets complicated:
JS.setCss("#gameBorder", "background-image:url(" + GetFileURL("gravestone.png") + ");")The status bar at the top uses an image. If you want to stop that image displaying, do this:
JS.setCss("#qv-status", "background-image:none;")This will change the width of the element. You have the potential to mess up big time here, so change one element at a time and see what happens. Elements do impact on each other, so you may not see any difference. When experimenting, change the width of Quest itself (or the browser) to see what effect that has too.
Note that the value must include “px”, which says the units are pixels.
JS.setCss("#gameBorder", "width:950px;")opacity
Section titled “opacity”The opacity property defines how much this element covers the one below (the reverse of transparency). It can range from 0.0 (this element is not visible) to 1.0 (this element is completely opaque).
JS.setCss("#gameBorder", "opacity:0.5;")border
Section titled “border”The border property lets you set borders. You can set various aspects in one go, so in this example a dashed line, 5 px wide and blue, will be added.
JS.setCss("#gameBorder", "border:dashed 5px blue;")The status bar at the top has a blue border. If you want to remove it, do this (also set the width to 950px to keep it aligned):
JS.setCss("#qv-status", "border:none;")Awkward attributes
Section titled “Awkward attributes”The command bar
Section titled “The command bar”Some attributes are difficult to change, and the usual technique just does not work. A good example is the border of the command bar. The element’s ID is txtCommand, and it has border and outline properties, but if you set them to “none”, it does not work. Why not? No idea.
However, there is a way around. If you go into full code view (press F9), you can add an attribute to the XML of the game object that includes CSS.
<css><![CDATA[ <style> #txtCommand { outline:none; border: none; } </style>]]></css>Be careful how you do that; I would suggest pasting it below this line:
<firstpublished>2016</firstpublished>You can output that in game.start, and it should now make the required change.
JS.addText (game.css)You can turn off the border on the Interface tab of the game object, but there may well be other elements that need to be handled like this, for example….
Inventory items
Section titled “Inventory items”This technique will also allow you to change how inventory items are displayed. They do not have IDs, they uses classes instead, ui-selectee (for all objects in the list), ui-selected (for the selected one) and ui-selecting (for the selected one whilst clicked). The difference is that only one element on the page can have a specific ID but any number can have a class. You specify a class by using a ., rather than a #.
This example will alter the background colour when an item is selected.
<css><![CDATA[ <style> .ui-selected { background-color: darkblue; color: white; } .ui-selecting { background-color: blue; color: white; } </style>]]></css>Testing
Section titled “Testing”When you are messing with the interface, it is easy to get things wrong - or try to do something that is not possible. You should test your game to make sure it works as you expect and looks as you expect. In particular, you should check that it still works and looks the same after the player has reloaded a save game, as this is when problems most often come to light, and it is easy to forget to check this.
Various tricks
Section titled “Various tricks”A collection of tricks using the techniques already discussed.
The “Continue” link
Section titled “The “Continue” link”You can change the colour of hyperlinks on the Display tab of the game object, but it does not affect the “Continue” message when the game waits for the player to press a button, because that is actually part of the command line, not the output text. However, you can change it like this:
JS.setCss ("#txtCommandDiv a", "color:pink;")Note that the first parameter is identifying an a element (an HTML anchor, which is used for hyperlinks) inside of the #txtCommandDiv.
The “Saved” text
Section titled “The “Saved” text”The message that says the game is saved is also odd, in that is has no ID so cannot be changed through JQuery/CSS.
The solution is to change the style of a container element, however, even that is problematic as they may not exist yet when ‘InitUserInterface’ fires, so I suggest setting style properties on the body element (this is not an id, so has no # before it.
JS.setCss ("body", "color:orange;font-family:georgia,serif;")Changing the ending
Section titled “Changing the ending”The finish script command terminates the game, and replaces the panes on the right with a message. You can change the default font using JQuery again, to make it consistent with your game:
JS.setCss ("#gamePanesFinished", "font-family:Berkshire Swash;")You can also change what gets displayed, using the JQuery html method. In this example, I am modifying the text (using the html method of JQuery), and adding an image (and we have to use GetFileURL to do that). I am also building the string first, and then calling JS.eval.
This is the HTML I want to add:
<h2>Game Over</h2><p>This game has finished and you are dead!</p><img src="gravestone.png" />This is how we do it:
s = "$('#gamePanesFinished').html('<h2>Game Over</h2>"s = s + "<p>This game has finished and you are dead!</p>"s = s + "<img src=\"" + GetFileURL("gravestone.png") + "\" />"s = s + "');"JS.eval (s)finishChanging the arrows
Section titled “Changing the arrows”The arrows in the compass rose and the triangles to the left of the panes are icons that are defined in JQuery. To change their color, you need to replace the image file (they are all in one file).
You can get an image file with the right colours, from here: http://download.jqueryui.com/themeroller/images/ui-icons_800080_256x240.png

You can change the number 800080 to the RGB colour what you want (I guess the file server creates the images on the fly, and will accept any value, but that may not be the case), this is a dark purple I was trying. Save the file in your game folder.
Then you just need to do this to get the new icons in your game (again, modifying the number for your downloaded file):
JS.setCss (".ui-icon", "background-image:url(" + GetFileURL("ui-icons_800080_256x240.png") + ");")Once you have the file, you could edit it to change the shape of the arrows too, or make them multicoloured (upload the image via the Assets manager in the editor toolbar).
Disable the panes
Section titled “Disable the panes”This will leave the panes there, but clicking on them will do nothing.
JS.setCss ("#gamePanesRunning", "pointer-events:none;")To enable them again:
JS.setCss ("#gamePanesRunning", "pointer-events:inherit;")Moving the screen to the bottom
Section titled “Moving the screen to the bottom”Sometimes when you display something on the screen, Quest fails to scroll down for. You can force that with this:
JS.scrollToEnd()Sticking the command bar to the bottom of the screen.
Section titled “Sticking the command bar to the bottom of the screen.”You can use this to keep the box where the player types pinned to the bottom of the screen. The first line sets its position to “fixed”, this means it will stay in one place relative to the screen. The second line specifies where it will be fixed. The third line stops the game printing messages behind the input box.
JS.setCss("#txtCommandDiv", "position:fixed;bottom:10px")JS.setCss("#gameContent", "margin-bottom:70px;")